VIDEO

Dumbbell Single Leg Romanian Deadlift
This exercise is going to test your posture, stability. This is a great exercise for hamstrings and Lower Back. Stay straight with your feet together and the dumbbell in one hand. Leave the left foot down on the floor bending at knee slightly. And start lifting the right foot behind at the same time tilting your body forward. Make the movement slowly and smooth. Make sure that your back is straight the whole time.
save to ...
RECOMMENDED FOR YOU


ARTICLES
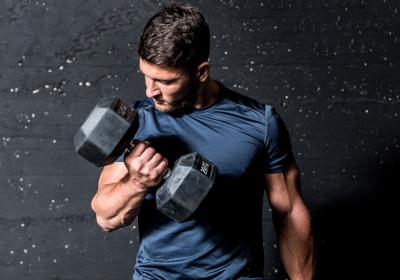
Biceps is the most famous muscle in the human muscular system, it is approximately one-third of the mass of the shoulder. It is a part of a group of three in the upper arm that works together with each other to lift the arm toward the shoulder. As one of the most visible and impressive parts of the body, “two-headed muscles” are often the gym’s focus.
It is responsible for two main movements of the arm. The first is raising your hand. Those who carry something using their arm are likely to engage them in the process, as some upward force must be applied during the process of carrying and lifting. The second movement, for which they are responsible, is called supination, which rotates the arm from the natural position of the palm down to the palm up.
Biceps are built as a result of injury, which is often achieved through lifting weights such as curls or other types of exercises. As the curls or other exercises are done, the muscles in the arm get minor injuries. These injuries must be repaired naturally. The recovery process, as a natural byproduct, usually leads to growth and strength gains, although this process can take several weeks or months before noticeable results are seen.
Very few exercises work for it without affecting the other parts of the shoulder. Therefore, there is no reason to worry that others in the upper arm might be neglected by focusing on them. Some may focus only on the arm and almost completely forget about the legs or the core.
As one of the most commonly used muscles in the body, the biceps can certainly be damaged. Biceps injuries are not as common as some other types of injuries, there is always a risk, especially among weightlifters. The most common type of injury is damage to the tendon. In this type of injury, It is pulled away from the tendon that attaches it to the arm in a bone also known as the radius. Such injuries occur when they are used suddenly or to a level that they cannot handle.
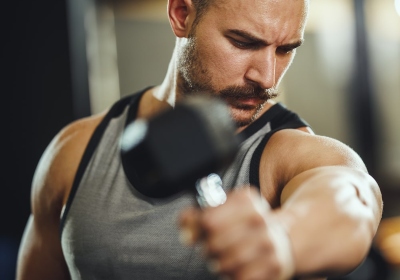
Training.
Dumbbell Bicep Curls. Stand straight with the dumbbell in each hand and with your feet shoulder-width apart. Once the dumbbells are at your shoulder level, start slowly lower your arms to the starting position. Repeat for the desired amount of repetitions.
Incline Pushup. Place your hands slightly wider than shoulder-width apart on a bench, chair, or couch. And assume a high plank position with your feet together and your body straight from head to heels. Keeping your feet flat and core engaged lower your chest to the bench or chair. Pause. And then push yourself back up to the starting position.
Diamond Knee Pushup. With your knees on the ground place your hands on the ground with your fingers and thumbs touching together creating the diamond shape. This action will engage more your tricep muscle. Then complete a push-up and get back to the starting position. Repeat for the desired number of repetitions.
Pike Pushup. Assume a shorter push-up position, get on your toes and put your butt up, shifting your weights to the front. Bending your arms slowly lower your head, be sure not to bump your head on the ground.
Read more
The shoulder muscles are divided into two groups. The anterior group consists of flexors: the coracohumeral, the brachialis, and the biceps brachii. The posterior group includes the extensors: the triceps brachii and ulnar.
The coracohumerals start from the coracoid process of the scapula fuses with the short head of the biceps brachii and pectoralis minor and attaches to the humerus at the level of the upper edge of the brachial.
The brachials start from the lower half of the anterior surface of the humerus and the intermuscular septa of the shoulder and attach to the tuberosity of the ulna and its coronal process.
The biceps brachii has two heads starting on the scapula from the supra-articular tubercle (long head) and the coracoid process (short head). It attaches to the forearm to the tuberosity of the radius and the fascia of the forearm. It belongs to the bicarticular part. Concerning the shoulder joint, the biceps of the shoulder is the flexor of the shoulder, and the elbow is the flexor and instep support of the forearm.
The triceps brachii is located on the back of the shoulder, has three heads, and is a bicarticular. It participates in the movements of both the shoulder and the forearm, causing extension and adduction in the shoulder joint and extension in the elbow.
The ulnar starts from the lateral epicondyle of the humerus and radial collateral ligament and the fascia; it is attached to the upper part of the posterior surface and partly to the olecranon of the ulna in its upper quarter. The function of this is to extend the forearm.
The bundles of the deltoid muscle perform different functions, so it will not work to load them all with one exercise: you will have to include at least three movements in the training. All exercises are divided into three parts: for pumping the front, middle and back beams. Pick exercises from our list below and add them to your workouts. The weight is necessary so that the last repetitions in the approach are given not easily, but without compromising the technique. You can train your shoulder straps both at home and in the gym. But it is necessary to have a bar and a gantry. Weight must be chosen in such a way that in every set it was possible to raise the average 8-10 times. This is how you can increase the volume and mass. If the same goal is set - to increase the strength, to train in the face of more severe conditions. In this case, the number of repeats will be 5-8. The number of reps is 4-5.
Barbell bench press. Take the shell on your chest, bring your elbows forward, tighten your abs, buttocks, legs. Squeeze the bar up, lower it back and repeat. When the bar passes your face, do not lift your chin, but squeeze it in yourself: this way the bar will go along the optimal trajectory. If the projectile remains in front of the body at the top point, and not above it, the load on the lower back increases. Therefore, try to take the barbell behind your head.
Standing dumbbell press. Raise your arms with the selected weight to shoulder level, turn your palms forward with your fingers. Squeeze the dumbbells up and take them slightly behind your head, and then lower them to the starting position and repeat. Do three to five approaches 10-12 times.
Seated Bent-Over Dumbbell Routing. Sit on a bench, tilt your body with a straight back, as far as flexibility allows, hold the dumbbells in your lowered hands. Without changing the position of the body, spread your arms with the taken weight on the sides to shoulder level. Slowly lower the dumbbells to the starting position and repeat.
Read more
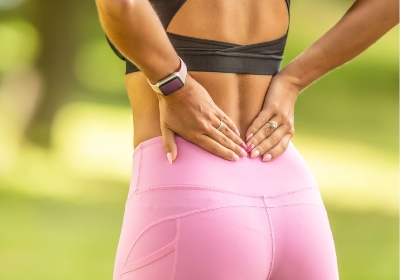
Your lower back includes the 5 vertebral bones that are placed on top of each other with intervertebral discs. The bones are connected there using unique joints. The lumbar spine is matched with the thoracic region above and the thighs below.
Individual anatomical structures include :
Vertebrae. It protects important nerve tissues such as the spinal cord and cauda equina.
Disks. The discs usually provide cushioning and cushioning to protect the vertebrae during spinal movements.
Facet joints give a little stability and allow the spine to move in various directions. The facets of the upper lumbar vertebrae are almost the same as the facet joints of the chest and, as it was already written, the main aim is controlling the movement of the spine.
The facets of the lumbar are more flexible and facilitate side-to-side movement.
The large muscles and complex network of ligaments support serve to stabilize it and enhance your twisting and bending movements.
The lumbar supports most of the body. A lot of people feel this kind of pain at some point sometimes. Sedentary muscle atrophy is common, especially if you work in an office and lead a relatively sedentary lifestyle. If you want to make your lower back stronger, start with a regular training program that consists of strength training, stretching, and aerobics or cardiovascular exercise.
Training
Child's pose. Get on all fours and stretch your arms out in front of you. Gently lower your buttocks to your heels. Lower your head to the floor and push your palms forward until your arms are fully extended. Stay in this position for 30 seconds.
Lunges. Lunge with your right foot forward, rest on your hands. Please note that the right hand should be to the left of the leg. Step your right foot about the width of your right hand. Next, without moving your arms, swing your hips forward to stretch the front of the thighs, and hold in this position for 30 seconds. Do the same with the other leg.
Seated crunches. Sit with your legs straight, then bend your knees and bring your left leg over your right, placing it on the outside of your right thigh. Pull your right foot closer to your right buttock. Next, bend your right arm at the elbow and put it behind your left knee, as if keeping yourself twisted. Hold this position for 30 seconds. and repeat the same for the other leg.
Happy child. Lie on the floor, as you exhale, pull your knees to your stomach. As you inhale, grab the outer sides of your feet with your hands. Slightly spread the knees to the sides slightly wider than the body, pull the knees to the armpits. Make sure your shins are perpendicular to the floor. Hold this pose for 30 seconds.
Twisting. Lie on the floor and bend your knees, take your legs to the side, for example to the right. In this case, the left leg should lie on the floor, and the right ankle should be above the left knee. Place your hands next to your head, with your right knee strive downward (to the floor). Stay in this position for 30 seconds. alternately for each side.
Read more

The hips are some of the strongest muscles in the human body. They keep the torso upright, control the hip and knee joints, and are engaged during various activities and even at rest. Their proper functioning is extremely important, and anyone should know how they function.
The muscles located on the hip are involved in both hip and knee movements, providing different positions of the hip in space depending on the proximal or distal support. Topographically, the hipі are divided into three groups. The anterior group includes the flexors: the quadriceps and the tailor muscle. The medial group consists of the hip drive muscles: the comb, the long, short, big adductor, and the thin muscle. The posterior group includes the hip extensors: biceps femoris, semitendinosus, and semi-perineal.
The lateral outer and inner thigh muscles are considered antagonistic pairs: while one group is working, the other group relaxes. The abductors, including the middle gluteal, small gluteal, thigh broad fascia tensor, pear, and tail muscles are responsible for your leg movements from the middle of your body.
Essentially, whenever you take a step to the side or turn your foot on the bed, you are activating the abductors. The inner thigh muscles, particularly the large adductor, small adductor, short adductor, and long adductor muscles perform the opposite task, working whenever you move your leg toward the center of your body.
Strong and injury-resistant athletes have well-trained hip muscles. This is very important when it comes to fast sports with a lot of lateral movements, such as tennis or basketball, but also when you want to work out without pain. If your goal is to strengthen your hip muscles, which is really important, but you don't have your favorite leg workout, we will share some great exercises with you.
Wide Squats. Every leg workout should include different variations of squats. This exercise targets the lower body, including the inner and outer thighs. But to really engage your thigh muscles, you should do deep squats with your legs turned outward.
Sumo Deadlift. The Sumo deadlift is based on a similar leg position as in the wide squat. However, it is the external rotation of the thigh muscles that results in increased involvement of the inner and outer thighs.
Side Leg Raises. A 2005 study published in the Journal of Orthopedic and Sports Physical Therapy found that side leg raises without weights are just as effective as other weighted exercises.
Side Leg Pull-Ups. The pull-up exercise can be done anywhere because you don't need anything but a comfortable mat. This is a great exercise that you can add to your daily home workout routine.
Read more

This time we suggest paying special attention to the chest muscles. It is this zone that many athletes want to pump, but it is not so easy to do and one classic chest press is not enough.
Chest muscles are one of the most complex and largest muscle groups.
Therefore, competent training must be a combination of basic and isolation exercises. Only in this way, it will be possible to load the muscles at different angles. Exercises with barbells are suitable for increasing muscle mass, and with dumbbells, on blocks and training machines - for improving the form and detailed elaboration. These exercises also activate the stabilizing muscles.
Imagine that the chest muscle is a rubber band that connects the shoulder, collarbone, and sternum. If you lift your arm to the side and then pull the elastic band, it will move your shoulder forward. You do this movement all the time in your normal life like when you close a door, push something away with force, or elbow your jaw.
Most pectoral muscle exercises repeat this movement. The only difference is that they also use a barbell, dumbbells, or crossover slings to create extra resistance.
The chest muscle has two heads: an upper head (clavicle) and a lower head. Their functions are slightly different, and this is important. In order to have a symmetrical chest, you need to pump both heads.
The fibers of the clavicular head are directed upward, so you need to move the shoulder forward from the bottom to the top for additional exercise.
Many people believe that the more they pump their chest, the faster their muscle mass will increase. In fact, this has a negative effect on muscle growth. The muscle gets bigger during rest when the tissues are recovering from an active workout. There are a few tips on how to properly pump your pecs and not overtrain:
Exercise no more than 2 times in 7 days. In between do physical exercises on other parts of the body;
Do not exercise for more than 45 minutes, as this may cause muscle size and strong growth to regress.
Exercises that help you to pump the chest muscles include:
push-ups.
bench presses.
triceps push-ups.
To pump your muscles evenly, alternate your exercises. The bench press is great, but you don't have to do it in every workout, because there are other good options.
Choose the weight so that the last reps in an attempt are difficult. If you find it easy and your muscles don't tire, they won't grow.
Avoid flying in the clouds during the workout: concentrate on the muscle work. It really helps you to pump it better.
Perform 3-5 sets of 8-12 reps. Do not use weights that are too heavy. Especially at the beginning if you do not have a good command of technique.
Read more