VIDEO

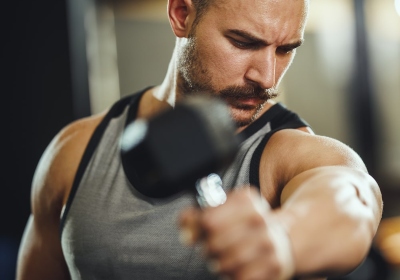
Dumbbell Snatch
This is a powerful exercise that is going target your Lower Back, legs, and shoulder stability as well. Stand straight with your feet slightly wider than shoulder-width apart. Squat down, grab the dumbbel in your hand, making sure that your feet are glued to the ground. And keeping your back straight, explode up, lifting the dumbbell above your head. Remember that you need to stay tall, and your back should be straight throughout the movement.
save to ...
RECOMMENDED FOR YOU


ARTICLES
The shoulder muscles are divided into two groups. The anterior group consists of flexors: the coracohumeral, the brachialis, and the biceps brachii. The posterior group includes the extensors: the triceps brachii and ulnar.
The coracohumerals start from the coracoid process of the scapula fuses with the short head of the biceps brachii and pectoralis minor and attaches to the humerus at the level of the upper edge of the brachial.
The brachials start from the lower half of the anterior surface of the humerus and the intermuscular septa of the shoulder and attach to the tuberosity of the ulna and its coronal process.
The biceps brachii has two heads starting on the scapula from the supra-articular tubercle (long head) and the coracoid process (short head). It attaches to the forearm to the tuberosity of the radius and the fascia of the forearm. It belongs to the bicarticular part. Concerning the shoulder joint, the biceps of the shoulder is the flexor of the shoulder, and the elbow is the flexor and instep support of the forearm.
The triceps brachii is located on the back of the shoulder, has three heads, and is a bicarticular. It participates in the movements of both the shoulder and the forearm, causing extension and adduction in the shoulder joint and extension in the elbow.
The ulnar starts from the lateral epicondyle of the humerus and radial collateral ligament and the fascia; it is attached to the upper part of the posterior surface and partly to the olecranon of the ulna in its upper quarter. The function of this is to extend the forearm.
The bundles of the deltoid muscle perform different functions, so it will not work to load them all with one exercise: you will have to include at least three movements in the training. All exercises are divided into three parts: for pumping the front, middle and back beams. Pick exercises from our list below and add them to your workouts. The weight is necessary so that the last repetitions in the approach are given not easily, but without compromising the technique. You can train your shoulder straps both at home and in the gym. But it is necessary to have a bar and a gantry. Weight must be chosen in such a way that in every set it was possible to raise the average 8-10 times. This is how you can increase the volume and mass. If the same goal is set - to increase the strength, to train in the face of more severe conditions. In this case, the number of repeats will be 5-8. The number of reps is 4-5.
Barbell bench press. Take the shell on your chest, bring your elbows forward, tighten your abs, buttocks, legs. Squeeze the bar up, lower it back and repeat. When the bar passes your face, do not lift your chin, but squeeze it in yourself: this way the bar will go along the optimal trajectory. If the projectile remains in front of the body at the top point, and not above it, the load on the lower back increases. Therefore, try to take the barbell behind your head.
Standing dumbbell press. Raise your arms with the selected weight to shoulder level, turn your palms forward with your fingers. Squeeze the dumbbells up and take them slightly behind your head, and then lower them to the starting position and repeat. Do three to five approaches 10-12 times.
Seated Bent-Over Dumbbell Routing. Sit on a bench, tilt your body with a straight back, as far as flexibility allows, hold the dumbbells in your lowered hands. Without changing the position of the body, spread your arms with the taken weight on the sides to shoulder level. Slowly lower the dumbbells to the starting position and repeat.
Read more
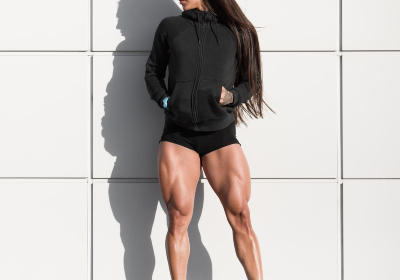
One of the most important running muscles is the quadriceps - the large muscle at the front of the thigh. It has been scientifically proven that regular strength training improves workout performance and reduces the risk of injury, as well as strengthens your back, and leg muscles, making your running more productive.
The quads, also known as the quadriceps muscle, is a group of muscles located at the front of the leg above the knee. It is one of the largest and strongest muscles in your body that consists of four heads: fastus medialis (medial wide), vastus intermedius (intermediate wide), vastus lateralis (lateral), and rectus femoris (straight thigh muscle). Almost every action performed by the legs involves two or more heads of the quadriceps. The quadriceps muscle plays an important role at the beginning of the movement (quick start) and during ascent and descent in elevated positions - which is why you may experience painful sensations in this area of the leg after an intense uphill workout.
According to researchers at the University of Delaware, strong quadriceps act as cushioning and can protect the knees and the entire musculature of the hip from common running injuries. Often many runners are injured because they have weak and underdeveloped quadriceps, so it is especially important to strengthen them.
By training and strengthening the quads, you can get the following benefits when running:
Increased speed. Strong quadriceps help you tackle steep hills and climbs more easily and make pushing off the ground more powerful, resulting in increased speed.
Reduced injuries. According to research, poorly developed quadriceps are often associated with many running injuries. For example, a common injury such as the 'runner`s knee' results from weakness in these muscles, which are unable to stabilize the knee joint during the movement.
Increased endurance. Strengthening the quadriceps muscle will make your running more effortless and efficient, which contributes to increased running volume and endurance.
Training
The quadriceps occupy 70% of the muscle mass of the leg, so it is their development that is fundamental in leg training. The main exercise for developing the quadriceps is the squat. But, for beginners, at the first stages of training, it is better to start with leg curls sitting in an exercise machine, leg press, and hyperextensions to strengthen the lower back, to avoid injuries, in order to prepare the base for the heavy squats. It is a good idea to include squats in your training plan after about six months of training.
Read more

Push-ups, strength exercises, gymnastic elements on rings and a horizontal bar, handstand - all these exercises require strong and flexible wrists. Let’s discuss how to develop your wrist strength and do exercises without pain and discomfort.
The wrist is a movable connection of the bones of the forearm and hand of a person. It is formed by the extended and concave carpal articular surface of the radius and a medially located triangular cartilaginous disc, representing a concave articular surface articulating with the convex proximal (located closer to the body) articular surface of the bones of the first row of the wrist: scaphoid, lunate and trihedral.
The proximal row is connected with the exchange cyst behind the additional exchange wrist joint. The skin row is set in an arch, bent proximally and distally bent. On the long sides of the wrists of the vignutia set up the carpal canal, we will fix the flexor retinaculum. The proximal row is connected with the surfaces of the exchange brush and the distal row. In the proximal row, the dermal cyst can be surrounded by an undisclosed ruffle: for example, it is more like the fate of the unprotected midget steel, which can be easily joined from the trapezoidal and trapezoidal style. The cysts of the distal row, on the other hand, are more rigidly fastened, so that the whole row collapses at once with the pastoral cysts.
Some sports require strong wrists. Wrist strength should be developed in parallel with flexibility. This will help you do exercises that require not only good grip but also joint mobility. Exercises for the wrists are also useful for people who are far from sports. Warming up and stretching the wrists can help avoid tunnel syndrome - the compression of the median nerve between the bones and tendons of the wrist. Warming up will help relieve tension and will be excellent pain prevention.
The number of eight wrist cysts can be divided into two transverse rows (proximal and distal), or into three later colonies.
Training
Bear Crawl Lunge. Move forward by moving the right hand and the left leg with a crawling movement. Just after placing weight on the right hand and left leg, turn the sides and move the left hand and right leg forward. Keep the body pretty low and continue with crawling movements. Imagine that you are crawling beneath a low net.
Half Handstand Variation. Begin with the downward-facing dog position. Walk your feet in closer to your hands. Keep your left foot on the ground, lifting onto the ball, and begin bending the knee. Lift the right leg and straighten it behind you. After taking a few hops, jump off the bent leg and lift the straight leg toward vertical. Keep flexing your lifted foot for engagement. Now, try to bring both heels to the wall. Keep breathing deeply while your head is down between your upper arms. Remember to engage your legs and reach up through your heels. Walk your legs down the wall. Then get back to the starting position with your feet on the ground. Make a deep squat and jump out.
Inchworm Variation. Put your hands on the ground and your feet - on the elevated surface (a bench). Start walking your hands out, as far as you can keeping your legs straight throughout the movement. Make a pause. Walk your hands back up to the starting position.
Read more
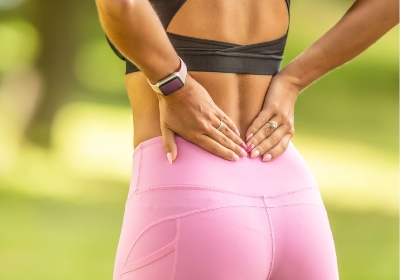
Your lower back includes the 5 vertebral bones that are placed on top of each other with intervertebral discs. The bones are connected there using unique joints. The lumbar spine is matched with the thoracic region above and the thighs below.
Individual anatomical structures include :
Vertebrae. It protects important nerve tissues such as the spinal cord and cauda equina.
Disks. The discs usually provide cushioning and cushioning to protect the vertebrae during spinal movements.
Facet joints give a little stability and allow the spine to move in various directions. The facets of the upper lumbar vertebrae are almost the same as the facet joints of the chest and, as it was already written, the main aim is controlling the movement of the spine.
The facets of the lumbar are more flexible and facilitate side-to-side movement.
The large muscles and complex network of ligaments support serve to stabilize it and enhance your twisting and bending movements.
The lumbar supports most of the body. A lot of people feel this kind of pain at some point sometimes. Sedentary muscle atrophy is common, especially if you work in an office and lead a relatively sedentary lifestyle. If you want to make your lower back stronger, start with a regular training program that consists of strength training, stretching, and aerobics or cardiovascular exercise.
Training
Child's pose. Get on all fours and stretch your arms out in front of you. Gently lower your buttocks to your heels. Lower your head to the floor and push your palms forward until your arms are fully extended. Stay in this position for 30 seconds.
Lunges. Lunge with your right foot forward, rest on your hands. Please note that the right hand should be to the left of the leg. Step your right foot about the width of your right hand. Next, without moving your arms, swing your hips forward to stretch the front of the thighs, and hold in this position for 30 seconds. Do the same with the other leg.
Seated crunches. Sit with your legs straight, then bend your knees and bring your left leg over your right, placing it on the outside of your right thigh. Pull your right foot closer to your right buttock. Next, bend your right arm at the elbow and put it behind your left knee, as if keeping yourself twisted. Hold this position for 30 seconds. and repeat the same for the other leg.
Happy child. Lie on the floor, as you exhale, pull your knees to your stomach. As you inhale, grab the outer sides of your feet with your hands. Slightly spread the knees to the sides slightly wider than the body, pull the knees to the armpits. Make sure your shins are perpendicular to the floor. Hold this pose for 30 seconds.
Twisting. Lie on the floor and bend your knees, take your legs to the side, for example to the right. In this case, the left leg should lie on the floor, and the right ankle should be above the left knee. Place your hands next to your head, with your right knee strive downward (to the floor). Stay in this position for 30 seconds. alternately for each side.
Read more
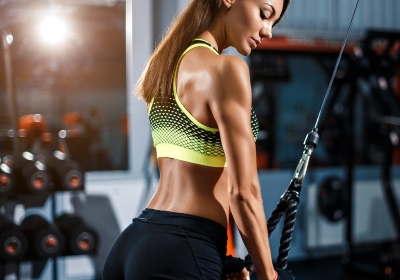
The muscle on the back of your shoulder is called the triceps. Triceps originate from the scapula and humerus and attach to the ulna using the triceps tendon. The triceps muscle does the function of extension in the elbow and acts as an auxiliary in the implementation of other movements in the shoulder. During triceps contraction, the vector of movement is transmitted using the tendon.
The mass fraction of the triceps is approximately 2/3 of the muscles of the shoulder, so its size plays a critical role in the formation of beautiful arms. By focusing on the biceps, and forgetting about the triceps muscle, athletes contribute to getting inharmoniously developed arms.
You shouldn't train your triceps more often than 1-2 times a week. Do not forget that many exercises for the pectoral muscles load the triceps, so make up the training program so that the triceps and pectoral muscles are trained on different and distant days, thus some periodization of the load is achieved.
But in some cases, the triceps can be trained on the same day as the pectorals, since all basic chest exercises involve the triceps and vice versa. This means that if you swing your chest, then the triceps already swing by themselves. To increase efficiency, do triceps workouts of different intensities: light-medium-hard, and so on. Rest for at least 1 week after a hard workout.
In classic splits, the triceps are usually the most overloaded muscle, due to the very specifics of training in split programs. To increase the volume of the triceps muscle, do 8-15 repetitions. The total number of triceps sets (the sum of the sets of all triceps exercises) is 3-6.
The basic exercises for pumping triceps are reverse push-ups on the bench and narrow grip barbell press. In addition, an important exercise is a pull of the upper block with a rope - one of the few that uses the lateral head in the work. Since the mechanics of movements are in many ways similar, it is recommended not to combine the presented exercises, but to alternate.
Training.
Reverse push-ups from the bench. Starting position - heels touch the floor, hands on the bench behind your back. Slowly lower your torso down, linger at the bottom point, then with an explosive force push your body weight up over the bench. The elbows are directed backward. To complicate things, use an extra load by putting the weight on your hips.
Bench press with a narrow grip. It’s the exercise to work out the medial head of the triceps. Lie on a bench (keeping your feet firmly on the floor), grab a barbell or dumbbell with a narrow grip, then lift the weight up. During execution, the elbows should be pressed as close to the body as possible.
Bent over triceps extension. It’s for pumping the long and lateral heads of the triceps. When pulling the arm back, make sure that the elbow does not change position (that is, do not swing the arm back and forth or left and right). Also, watch out for the arch of the back - to do this, keep the abs slightly tense.
Top pulldown with rope. A key exercise for pumping the lateral head of the triceps. The movement should be in the lower plane - that is, do not raise your arms higher than chest level. When doing it, make sure that the elbows do not change position, and the body does not swing.
Remember that when building the triceps, you need to correctly feel the amplitude of the exercises - achieving maximum involvement of the muscles without dangerous impact on the shoulder joint. For this, it is better to use an average working weight.
Furthermore, watch your shoulders and head - in particular, don't round your shoulders or lean forward. When doing triceps exercises, the chest should be open, the press should be tense. Otherwise, the load is transferred to the shoulder joints.
Read more